
Saturday, August 17, 2013
Into the Sky: Hours 1-2
So in the first two hours of my project, I've programmed some basic GUI code. I'm using Java and Swing for the front end since I have a good deal of experience with it. The way I see it, an RPG needs a few core features in the GUI: A way to display stats, inventory, skills, etc., a console for displaying messages and chats, and a main screen to display whatever is happening in the RPG world. I decided that I would use a sidebar on the left side of the screen with tabs for Stats, Skills, and Inventory with a Text Area at the bottom for displaying item/skill/stat descriptions. Then the main screen would be on the right side above the chat/console window. Everything is thrown together using JSplitPanes so that the user can customize the sizing of all the elements based on how the like it. I started with the main code and adjusted down to the subcomponents since I prefer a top down approach. The final product is in the picture below and all of the code is available at my github at https://github.com/kelliott121/IntoTheSky.
 You'll notice the sidebar has separate tabs for each category, making it pretty easily expandable. At some point I will probably add a settings or some such. I've also included some example items for each tab. The bottom console has a text area for displaying console messages and a text input area for chatting. Lastly there's the screen, where I've implemented a small example for how it will be set up. I'm using the JPanel class with a GridBagLayout and making a 2D array of JLabels with ImageIcons for the background images. Since I'm shooting for a D&D style grid based game, I figured this would make it the easiest to implement.
Thursday, August 15, 2013
Game Design Project
One of the main types of coding projects I periodically come back to is game design, with my preference being RPGs. As a kid, I played a handful of MMORPGs and some D&D, and at one point aspired to be a writer. Since then I've ended up quite a ways from publishing my own novels, but I still enjoy thinking up entertaining fantasy and scifi scenarios as a creative outlet. One bonus of being able to program is that I actually have the capability to implement some of these scenarios in the form of a game (assuming the art doesn't need to be above a 3rd grade level).
So I've fiddled around with a few RPG programming projects in the past couple of years, with none of them really going anywhere. Just the other day, I started another one I've been conceptualizing for a couple of months. Last spring my roommates and I started doing weekly D&D sessions, but after graduation it's been pretty much impossible for us to set aside time to learn the online D&D tools in addition to the hours it could take for a single gaming session. Parallel to that, I also pondered about a science fiction game focusing on early space travel for humanity. I personally enjoy science fiction shows and books about humanity's crawl from where we are now to an interstellar society. I find near future, or at least futures heavily rooted in the present, settings to be the most compelling. So I thought about different ideas for how we could reach the technology of interstellar travel and how that would relate to an RPG.
Since I will most likely never get to the point where I can design a high end 3D game, I've decided to shoot lower and attempt to combine the story I was creating with the game mechanics of Dungeons and Dragons. This way I can hopefully one day soon continue my gaming sessions with my roommates in addition to providing myself a creative outlet. With work, however, I can usually only average one or two productive hours a day, so I'm going to try and break down my design process on this blog hour by hour. This way I'll be able to have an in depth view of how my game develops and hopefully some input from readers.
Wednesday, August 14, 2013
Life Update
It's been a while since my last post, and quite a bit has happened in my life. I've graduated University of Delaware with my Bachelor's and have two classes left until I finish my Master's Degree, which I hope to do this Winter. I will be taking this classes remotely from my new home in Pittsburgh, where I'm also working full time at Aerotech Inc, a motion control solutions company. I've been there for about a month now, and it's been very interesting so far. I've learned quite a bit about how larger companies operate as well as some professional programming styles. I'll most likely be working very closely with DSPs and FPGAs, and I look forward to learning a lot about them!
Saturday, March 2, 2013
The Deconstruction
***Developing***
Last weekend I had the great opportunity to participate in a 48hr hackathon. Called The Deconstruction, it involved a 48hr marathon where teams people from any age or background got together and built a project of our choice. Aside from some of the creepy messages we got from trolls on our stream, it was awesome! I think setting aside everything and taking a weekend to concentrate on making something is great and really spurs creativity. I'm just lucky school is still slow and I didn't have much work.
So on to the project. Ever since last summer, I've wanted to build an automatic drink mixing machine. I even spent a fair bit of time planning it out and ordered some of the parts. When I presented the idea to my teammates they all jumped on board and we decided to do that this weekend. Our team was The Dangerous Dijkstras. A lot of details about the construction of the project are at the team site.
Here are some videos of the final project.
Super Xilinx Kart
So here's an attempt at documenting an old project from last semester. In my Computer Systems Design class we worked with Spartan 3E 500 FPGAs and we could do basically anything we wanted for the final project. So a friend and I decided to make a Mario Kart clone. We used the Xilinx ISE, XPS version 10.4 and Verilog. All the graphics and hardware controls for the game are written in software. Everything else is pure hardware. Essentially we implemented a rudimentary GPU that performs graphics transformations in hardware to overcome the speed limitations of linear processing. Lastly note that most of this is lifted from the written report so please excuse the formal tone and any grammar mismatches.
We drew a lot of our inspiration from the game Super Mario Kart on the Super Nintendo. This game
utilizes a hardware rendering mode called “mode 7.” In “mode 7” a perspective transform is applied to a background bitmap which gives the illusion of a 3D plane. Our foremost goal in this project was to get this mode working on the FPGA in hardware.
Transforms
The main image processing section of our hardware uses a three stage processing pipeline to create the
3D effect. In 2D vga games, pixel values are fed into differing components which output an RGB value that is given to the display. In our design, the same pixel values (X and Y on the screen) are fed into a
pipeline which applies three separate transforms to get a resulting X,Y location. This location is fed into a component which contains a hardware synthesized course map. The course map is what finally
outputs the RGB color that is fed into the VGA module. By mapping these screen locations to an internal course map via different image transforms, the illusion of three dimensions can be created.

The first stage of the pipeline handles image translation. Our goal was to keep the player at the center
of the screen at all times. Using the position of the player, we shifted the course map to achieve this.

The next stage was rotation. Since sprites implemented in software are very costly in terms of memory, we chose to keep number low. Rotating the map to accommodate the player's orientation allowed us to extend the 3D effect as well as use one sprite for all situations.

Lastly was the unsuccessful perspective transform. The intent of this transform was to expand the
course map as the screen_y increased to give the appearance of depth and a horizon. While initially
successful, results of the perspective transform were warped after a bug fix in the translation transform. Translation was set as a higher priority than perspective and due to lack of time a solution was never established.
It is worth noting that the perspective transform is the most mathematically complicated of the three and as such it was hard to create a perfect perspective transform without spending more time than was possible devoted to the mathematics. In the Java mock up for the different transforms, the transform matrix above was used to generate proportionately scaled perspective, however, we found out that implementing exponentiation with variables was incredibly difficult with FPGAs and so a workaround had to be used that resulted in the disproportionate perspectives seen above.


We drew a lot of our inspiration from the game Super Mario Kart on the Super Nintendo. This game
utilizes a hardware rendering mode called “mode 7.” In “mode 7” a perspective transform is applied to a background bitmap which gives the illusion of a 3D plane. Our foremost goal in this project was to get this mode working on the FPGA in hardware.
 |
| Super Mario Kart Screenshot Notice how you can clearly see the difference between the character sprites and transformed 2D background |
In addition to “mode 7” we also wanted to implement a general purpose hardware framework.
Processors with low clock speeds and small memories often have a hard time rendering large, complex
graphical scenes in real time. We set out to design a coprocessor that could render any graphical scene
you could throw at and make it all addressable from software. To do this we once again took inspiration from video game consoles of the past. We wanted to build a sprite system where sprites could be loaded from software into special purpose buffers that would allow for fast rendering. We would additionally have buffers for background bitmaps that we could apply the perspective transforms to.
Transforms
| Pipeline |
| Proof of concept tests for Rotation, Translation, and Perspective transform equations |
The main image processing section of our hardware uses a three stage processing pipeline to create the
3D effect. In 2D vga games, pixel values are fed into differing components which output an RGB value that is given to the display. In our design, the same pixel values (X and Y on the screen) are fed into a
pipeline which applies three separate transforms to get a resulting X,Y location. This location is fed into a component which contains a hardware synthesized course map. The course map is what finally
outputs the RGB color that is fed into the VGA module. By mapping these screen locations to an internal course map via different image transforms, the illusion of three dimensions can be created.
The first stage of the pipeline handles image translation. Our goal was to keep the player at the center
of the screen at all times. Using the position of the player, we shifted the course map to achieve this.
The next stage was rotation. Since sprites implemented in software are very costly in terms of memory, we chose to keep number low. Rotating the map to accommodate the player's orientation allowed us to extend the 3D effect as well as use one sprite for all situations.
Lastly was the unsuccessful perspective transform. The intent of this transform was to expand the
course map as the screen_y increased to give the appearance of depth and a horizon. While initially
successful, results of the perspective transform were warped after a bug fix in the translation transform. Translation was set as a higher priority than perspective and due to lack of time a solution was never established.
Sprites
Sprites are graphical objects that are handled separately from the rest of a scene in graphical overlays.
They are a method of integrating unrelated bitmaps in order to create a full scene. The main benefit of
sprites is that they use a very small amount of memory and processing power compared to rendering a
full scene. They consist of a series of bitmaps that can be overlaid on the rest of the scene that the graphics processor is rendering. This means that the processor only has to keep track of the location of the sprite and it’s position, or animation progress. Below you can see an example of a sprite sheet from Super Mario Kart.
As you can see each of the squares contains Mario riding his kart in a different orientation. Game
programmers can use this sheet to make Mario rotate without using any advanced graphics processing
features (such as the transforms discussed in the previous section).
High Level Design
Our project is based on the Xilinx Spartan-3E FPGA chip. We used MicroBlaze, a softcore CPU provided by Xilinx in their Platform Studio, as the primary processor in our game and complemented it with a custom graphics coprocessor. We’re using onboard BRAM to store our program, which allows for optimal performance. We also have two additional hardware blocks, a button controller and an RS232 module, which provide input and debugging respectively. This is all outlined below in the system level block diagram.

Graphics Co-Processor
The graphics coprocessor is probably the most interesting part of the project. Our goals were to
implement “mode 7” as well as a software addressable sprite system. We did partially meet those goals. In the end our coprocessor supported 2 of the 3 transforms required to achieve “mode 7”. In our implementation we have the translation and rotation transforms working. While this does not provide an emulated 3D it still makes the game much more interesting. Additionally, we got the sprite system partially functional, due to hardware limitations we were only able to implement 2 sprite blocks at one time. This limited us to having two non-background objects on the screen at any one time. Below is a block diagram of how these modules interact with one another.

Game play
The Game play aspect of Super Xilinx Cart exists primarily in software, in accordance with our goals. We created two player objects, one for the computer and one for the player. The Microblaze processor reads the states of three buttons on the FPGA board and decides how to proceed based on that input.
- Left Button rotates map clockwise
- Right Button rotates map counter-clockwise
- Down button moves the map in the opposite direction of the player, making it appear as if the kart is moving forward
Some very basic boundary avoidance groundwork has been created. The center of the default course
has a blue square which represents a pool of water. If the player enters the boundary of the water, they are placed back at the start. This groundwork provides an example of addition boundary and obstacle avoidance that could be implemented in the future to improve upon the game. For example, this could be used to count laps once the player crosses the finish line, detect collisions with other players, and allow for speed changes over different terrain.
Lastly is the creation of a computer player. To demonstrate competitive nature of all racing games,
we've created a second sprite which stays close to the player throughout their run. It randomly swerves from side to side but slowly advances on the player's position. The goal of the player is to finish the race before the computer player passes them.
Design Challenges
The primary constraint on all aspects of this design was time. Finding time to focus and plan out the
design for this project proved more difficult than anticipated.
Another large challenge was the mathematics involved in the transformation pipeline. Implementing
the three transforms required study and derivation of several complex equations based on concepts in
linear algebra and computer graphics. The limitation of the hardware in this regard also proved rather
difficult. Due to the nature of FPGA's no existing sine and cosine functions are implemented and so
large lookup table modules had to be created. Additionally, to provide a smooth perspective transform with convincing depth perception, a second order differential equation was required, but hardware constraints limited the implementation to linear systems. Because of this the accuracy of the depth was sacrificed for ease of implementation.
Timing also proved to be an issue in the case of hardware design. The transformation pipeline
introduced large propagation delays into the system with the maximum clock frequency limited to
around 35MHz. The Microblaze and system clocks were brought down to 30MHz to compensate.
A smaller challenge that we faced was the complex nature of our project going beyond the realm of
conventional Xilinx Tool Usage. We had to learn our way around some of the more complex Xilinx tools in order to achieve the level of hardware control required for this project.
And lastly, I've included a video of the final working game. While I really wish there had been time to get the 3D perspective working, I'm still very happy with the result.
Thursday, February 21, 2013
Pie on the Face
So the head mounted display turned out to be a success! I now have a mobile Linux box with the following supplies.
- Spy Gear Video Car headset - As mentioned previously it runs on component video signals sent via a stereo audio cable. After buying a stereo jack and component connector from Radioshack, I hacked together an adapter to put power and component on the stereo cable.
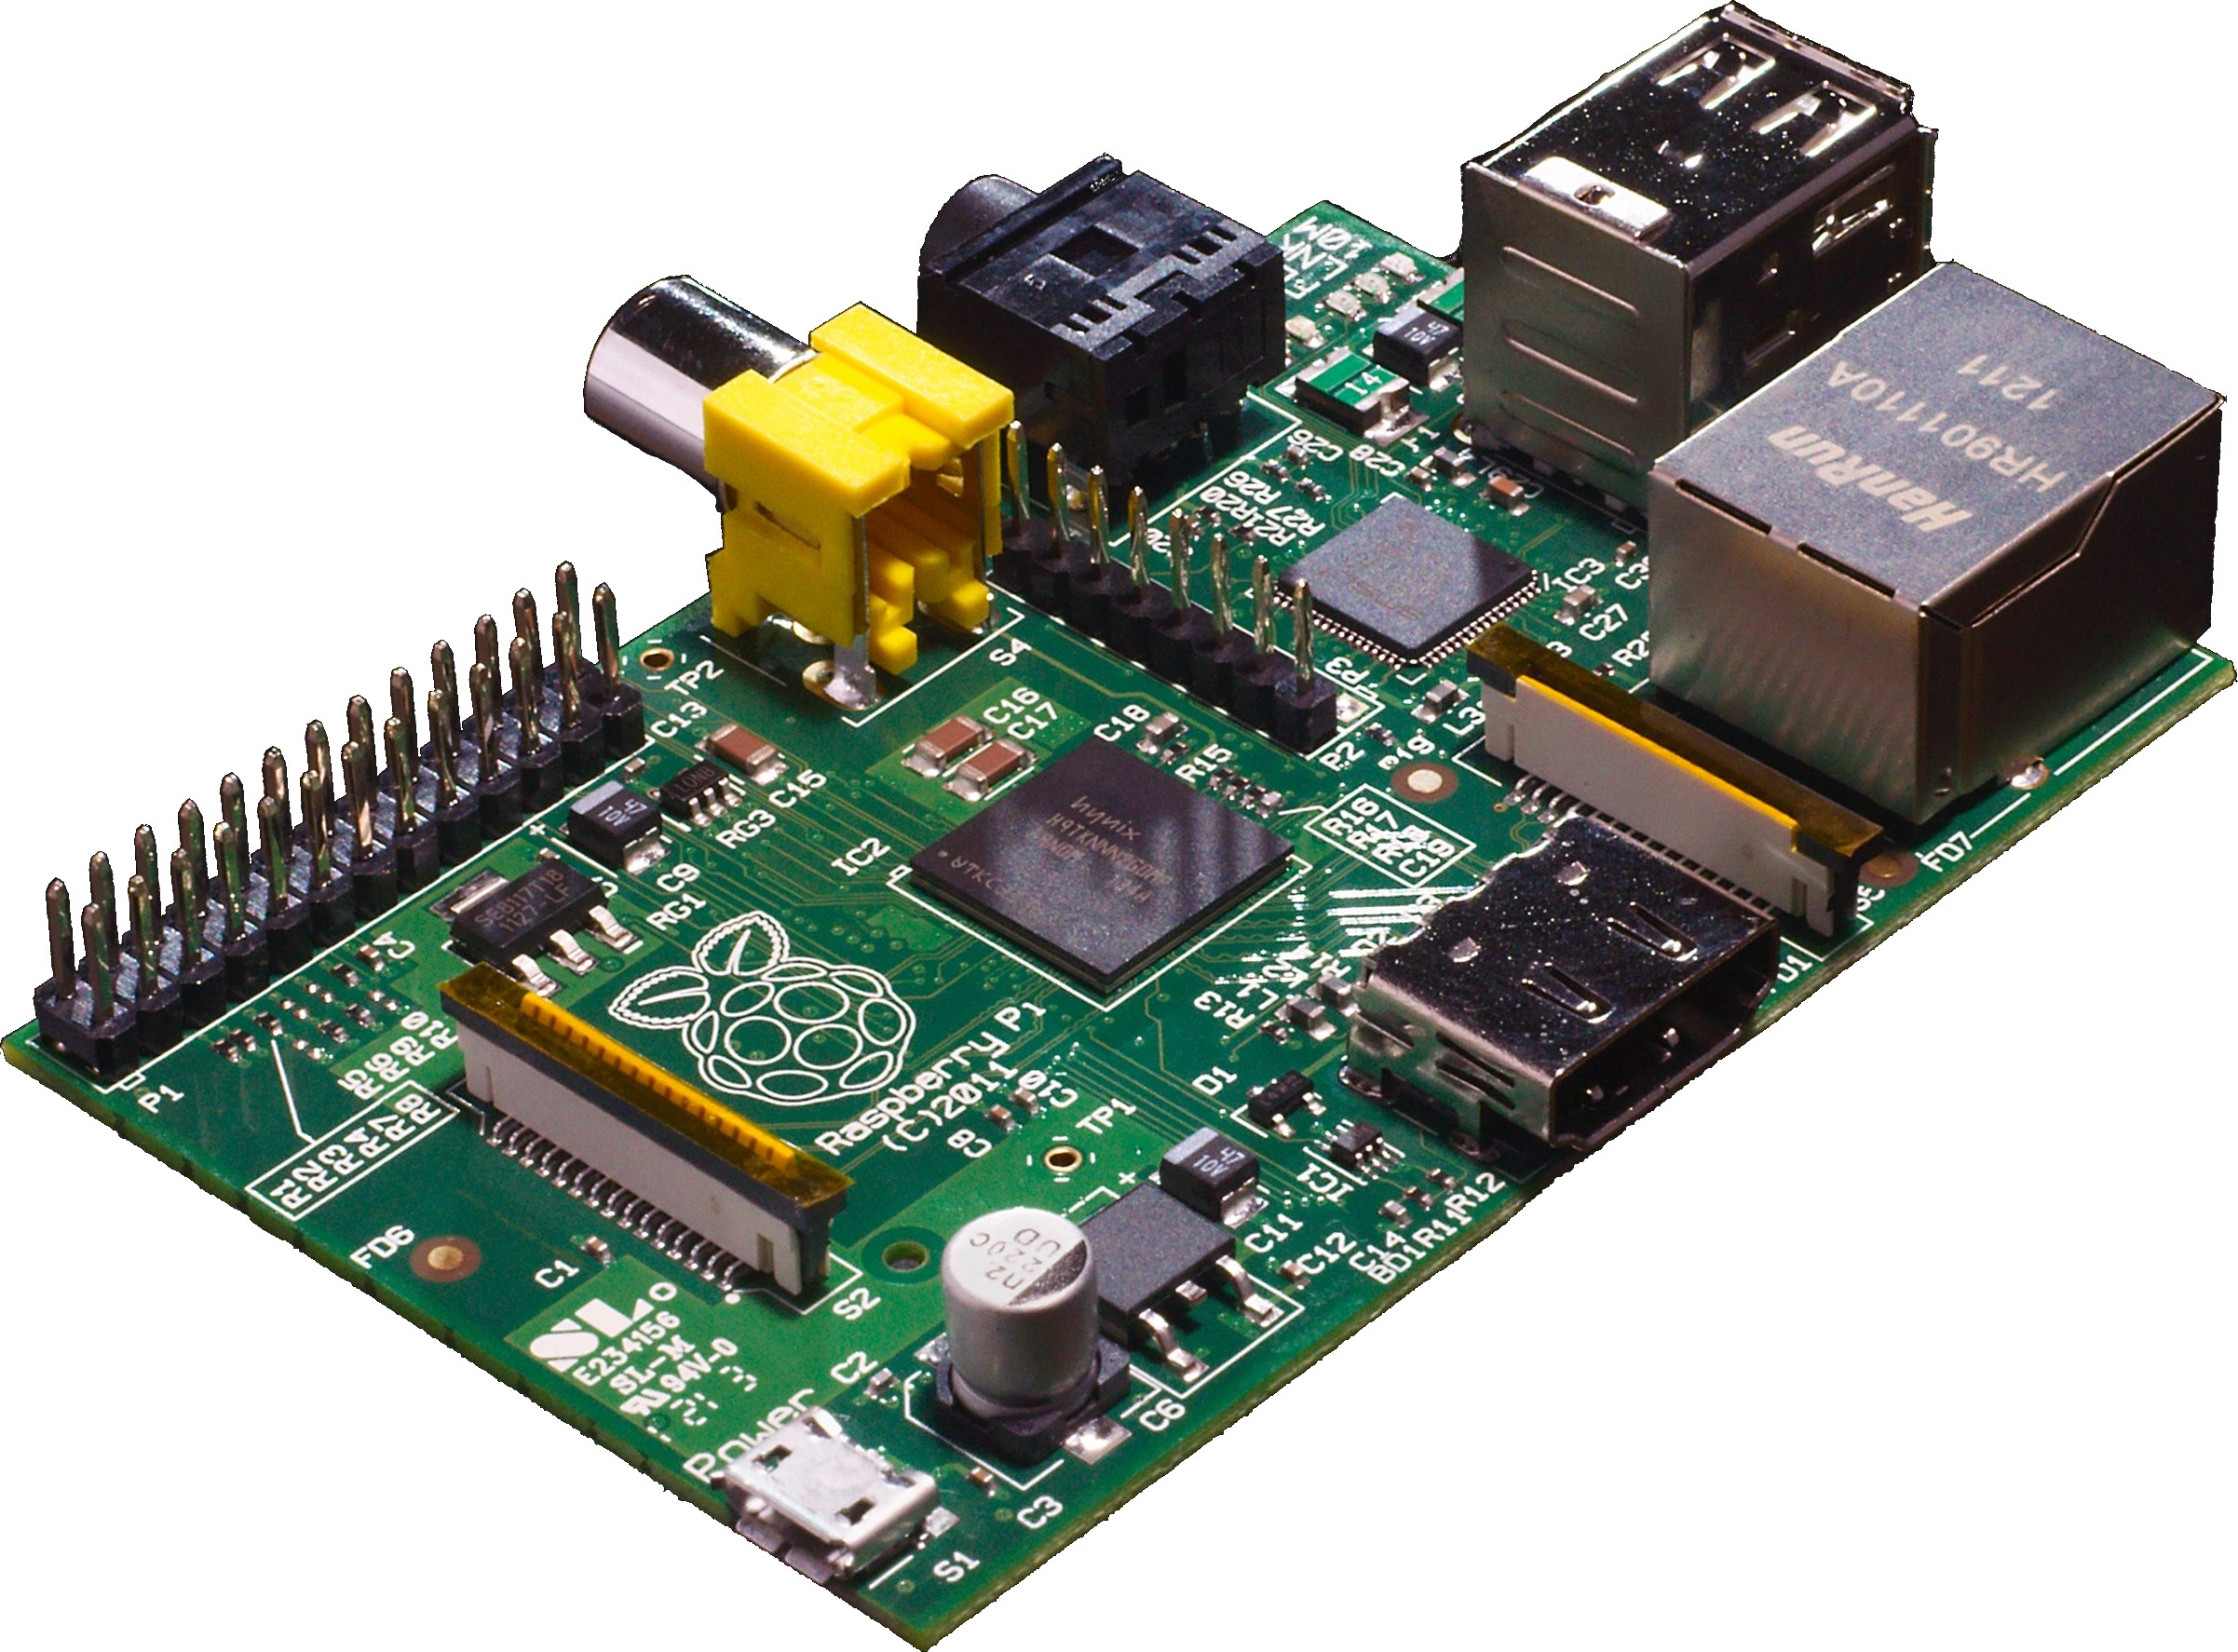
- Raspberry Pi - For those not familiar with it, it's a $35 Linux box with low power draw and a decent CPU. It has the option for a component video out with was critical for making this project work.
- Backup USB Battery - I bought one of these for $40 a while back to give extra juice to my tablet and phone, but it's turned out to be useful for other USB powered devices, such as the Raspberry Pi. By connecting it to the 1A output port, it can power the Raspberry Pi. Since the Raspberry Pi has a maximum current draw of 750mAh, it can run for roughly 16 hours. The Raspi also has a GPIO header with 5V and ground pins so I can use that as power input for the video headset. With some testing I verified that the display can work down to roughly a 3V input.
.png)
So after putting everything together, there were still a few kinks to work out. The display itself is only 320x240 which is half VGA resolution. It's also rather small and a little blurry, making it very difficult to see text since the display scales down the 640x480 resolution the Pi puts out. The display is also rigged to work with PAL video signals and the Raspberry Pi puts out NTSC by default so that also had to be changed. The way to fix both of these is to edit the config.txt file in the /boot/ directory. By adding the line
sdtv_mode=2
The default video format was set to PAL. The resolution required a little more tweaking. It seems that you can't change the actual resolution of the Pi, but you can change the pixel width. This is controlled by the framebuffer_width and framebuffer_height settings. By setting it 320x240, I was able to change the display show properly, but this proved to be too difficult to see. By halving it again to 160x120, the text is pretty much clear, albeit very large.
All in all this project has a lot of potential so I'll update the blog as I accomplish more things.
Sunday, January 27, 2013
New Phone!
For the past two years I've been using the Samsung Captivate, which is a variant of the Galaxy S, as my phone. It's an Android phone and has served me well. However, when I originally bought it I didn't realize how much I would love it. It was really the only Android phone available on AT&T at the time and since I knew I didn't want an iPhone, it's what I got. Let me just say I got very lucky. As I've recently learned, the Captivate was used as a model for the Nexus S phone by Samsung and since the Nexus line always receives updates straight from Google, it was fairly easy for developers to port the newest Android versions to the Captivate as well. This leads me to why I love the phone. The software that it came with was pretty crappy. Samsung was not considered the nicest manufacturer at the time, and was trying to throw out tons of phones in attempt to battle the iPhone. As such, my phone wasn't slated for many software updates and the skinned version of Android wasn't it top shape. Because of the many crashes I had to endure over the life of my warranty, I decided to root it once it expired.
Using Heimdall and the CyanogenMod website as a guide, I managed to successfully root it and install CyanogenMod 7.0. It was an amazing change of pace to say the least. New options were suddenly open to me. Instead of software created by a huge corporation with little concern for providing all the bells and whistles, I was suddenly using an amazing culmination of the thoughts, ideas, and innovations coded by the developers over at XDA. Features that I didn't even realize I wanted were suddenly open to me. It felt like an entirely new phone. And for someone like myself who always wants to stay on the cutting edge, the amount of ongoing development was wonderful. I could easily reflash new ROMs on my phone and stay up to date with the newest versions of Android. Over the past year I've kept my phone merely weeks behind the latest version of Android, something manufactures can't claim to have accomplished. In fact, via XDA my Captivate is currently running Android 4.2.1, Jelly Bean, which is actually an upgrade ahead of my new phone.
Deciding on a replacement for the second most valuable piece of tech in my life (the first being my laptop of course) proved exceedingly difficult. The Android market has changed drastically in the past two years and as such there are a huge number of options available, and while I try to keep up with the latest and greatest in mobile technology, I still had no clue what I wanted. After some thought on the phones available on my new carrier, Verizon, I narrowed my options down the Samsung Galaxy SIII and recently released HTC Droid DNA.
The SIII was an amazing piece of hardware, with a huge following and massive developer community. It also was, and still is, the most successful Android device. The main drawback, however, was the fact that the phone was around 8 months old, which is an eternity in mobile years. With a dual core processor, it had a hard time competing with newer devices, at least as far as benchmarks are concerned.
The DNA, on the other hand, was barely a month old and had a quad core processor and 1080p display. The only thing that had me worried about this phone was the lack of developer support. Compared to Samsung, HTC is a rather small company and hasn't been able to achieve the same success as the Galaxy series of phones. It can't afford to push a flagship phone to all the carriers or advertise as heavily as Samsung has done for the SIII. As such, the DNA is only available for Verizon, a rather disliked corporation as far as XDA is concerned, and has garnered comparatively little attention when considered with the SIII. So while I realized the DNA had everything I wanted in terms of hardware and specs, I knew it wouldn't be able to match the amazing amount of development I had become accustomed to on my Captivate.
After much deliberating I finally went with the DNA due to the hardware specs and build quality. I decided that while the development may not be as good, it might encourage me to do some developing on my own. And even if I never do get around to it, Android has become very stable in the past few years and as such I won't need to deal with the same amount of crashing and problems the original software for my Captivate provided so at the very least I'll have a working phone. It's been about a week since I got the DNA now and I'm definitely not regretting the decision. It's an amazing phone, feels fantastic, and is a pleasure to use and I look forward to tinkering with it for the next 22 months!
Subscribe to:
Posts (Atom)